I presented in the previous post my adventures with porting .NET nanoFramework to Linux and NuttX. In this article I will document how you can run .NET nanoFramework applications using this port on Raspberry Pi Zero.
You can use any solution created by the .NET nanoFramework extension for Visual Studio. Unfortunately there is not yet a template for the dotnet CLI (to be independent of VS 2019 for example). For this case I created an example that you can clone the repository.
⚠️ For the following steps we will use commands that are part of Mono. Make sure you have the latestmono-completepackage installed on your Linux distro.
Follow the steps with a terminal opened:
1- Clone the repository of examples:
git clone https://github.com/dotnuttx/nanoFrameworkPOSIX-samples.git
2- Go to the Blink folder:
cd nanoFrameworkPOSIX-samples/Blink
For this example we will compile the following Program.cs:
using System;
using System.Diagnostics;
using System.Threading;
using System.Device.Gpio;
using nanoFramework.Runtime.Native;

Debug.WriteLine($"Running nanoFramework on {SystemInfo.OEMString}");

try
{
    GpioController gpioController = new GpioController();
    int ledPinNumber;
    PinValue ledValue = PinValue.Low;
    GpioPin led;

    switch (SystemInfo.TargetName) {
        case "pi-zero":
            // pin 16 in the header is the gpio23
            ledPinNumber = 23;
        break;
        case "pi-pico":
            // onboard LED
            ledPinNumber = 25;
        break;
        default:
            throw new Exception($"Your target [{SystemInfo.TargetName}] does not support GPIOs");
    }

    // initialize pin
    led = gpioController.OpenPin(ledPinNumber, PinMode.Output);

    // blink forever
    while (true)
    {
        Debug.WriteLine($"Blinking {ledValue}");

        ledValue = !(bool)ledValue;
        led.Write(ledValue);

        Thread.Sleep(500);
    }
}
catch (Exception ex)
{
    Debug.WriteLine(ex.Message);
    Debug.WriteLine(ex.StackTrace);
}
3- Download the NuGet packages listed in packages.config, run:
nuget restore
⚠️ Thev2.6.4.6version of the interpreter for Linux needs exactly the1.10.5-preview.18version of thenanoFramework.CoreLibrarypackage
4- Compile the solution, run:
msbuild
After the build you should have the following files with the .pe extension in the project's bin/Debug/ folder:
ls -l bin/Debug/*.pe

-rw-r--r-- 1 castello castello   960 Jun 23 00:34 bin/Debug/Blink.pe
-rwxr--r-- 1 castello castello  5684 Jun 19 08:09 bin/Debug/System.Device.Gpio.pe
-rwxr--r-- 1 castello castello 31668 Jun 19 07:25 bin/Debug/mscorlib.pe
-rwxr--r-- 1 castello castello  3412 Jun 19 07:44 bin/Debug/nanoFramework.Runtime.Events.pe
-rwxr--r-- 1 castello castello  1496 Jun 19 07:46 bin/Debug/nanoFramework.Runtime.Native.peRuntime.Native.pe
These are the Portable executables/assemblies that the .NET nanoFramework interpreter knows how to read and execute. If you have them listed in the bin/Debug/ folder, congratulations 🎉 you have successfully compiled the application.
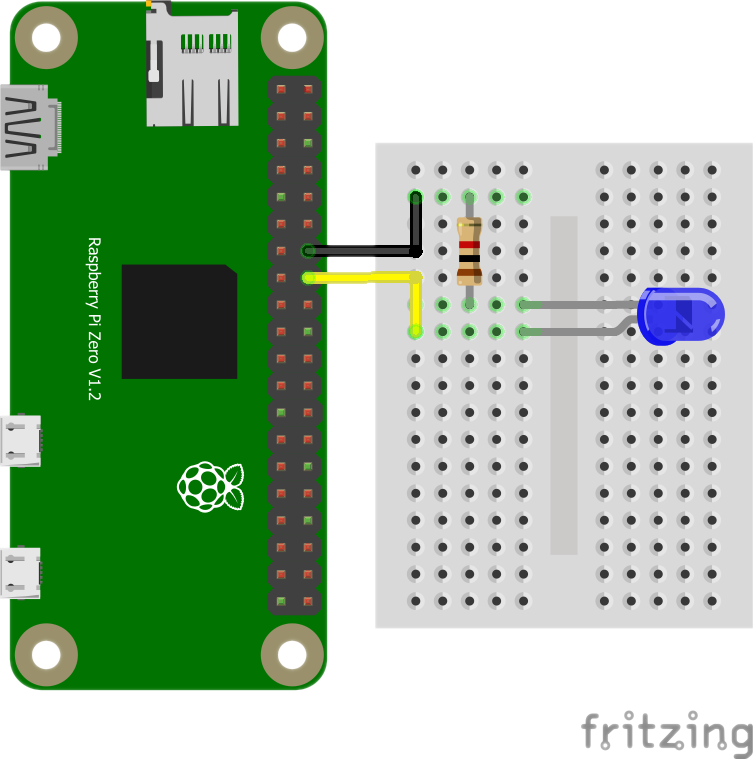
As we are going to blink we need an LED connected to the GPIO of our Raspberry Pi Zero. For this example I'm using GPIO23 pin 16 in the default Raspberry Pi B header:
⚠️ You can use any other GPIO available in your Pi Zero header. Remember to change theledPinNumberreference inProgram.cs
You can download pre-compiled Raspberry Pi Zero interpreter binaries here: https://github.com/dotnuttx/nf-Community-Targets/releases

⚠️ The following steps must be ran in a Raspberry Pi Zero terminal session. Connect via serial or SSH.
To install the runtime, download the binary, add execute permissions and move to /usr/bin/:
wget https://github.com/dotnuttx/nf-Community-Targets/releases/download/v2.6.4.6/dotnet-nf.armel-Linux.2646
chmod +x dotnet-nf.armel-Linux.2646
sudo mv dotnet-nf.armel-Linux.2646 /usr/bin/dotnet-nf
Now we can finally use the runtime, to run our compiled application in the first steps. The binary takes as argument the path of a folder where it will load all listed .pe files. On your development computer go to the Blink/bin/Debug/ folder of the example repository and copy all the .pe files for the Raspberry Pi Zero board. If you have configured SSH on your Raspberry Pi Zero you can run:
scp -r bin/Debug/*.pe pi@192.168.1.98:/home/pi
⚠️ Remembering that192.168.1.98is just an example of usage, change it to the local ip address of your Raspberry Pi Zero
⚠️ If you haven't set up SSH or don't have a Wi-Fi connection available, or even if you have the non-Wi-Fi supported version of Pi Zero, one option is to copy the.pefiles to thebootpartition from Raspberry Pi OS SDCard.
With the .pe files on the board you can now run your application:
⚠️ If you have copied the files via SSH to/home/pi
dotnet-nf /home/pi/
⚠️ If you have copied the files to thebootpartition of the SDCard. Here I created a newnffolder, so the command was:
dotnet-nf /boot/nf/
If you have something like the following output and your LED is blinking:
Congratulations 🎉! You ran your first blink using .NET nanoFramework on a Raspberry Pi Zero.
Having nanoFramework running on Linux arm32v6 is an interesting option. For example, "full" dotnet only supports arm32v7 and arm64v8. Another option might be Mono, which also has releases for arm32v6. The mono-runtime package on the Raspberry Pi OS installs ~20.7MB
⚠️ Remembering that this is something I am working on weekends and during my free time. It's 'EXTREMELY EXPERIMENTAL' and I'm not being funded by any group or institution for do it.
Did you like the possibility? If this is in any way helpful, or makes sense to you, let me know. Send me a hello on Twitter @math_castello or Linkedin 👍