Who has never blink a LED using /sys/class/gpio on Embedded Linux? But that interface, which used to access GPIO via sysfs, has its days numbered and should be removed from the Linux Kernel later this year.
Since version 4.8 of the Linux Kernel, launched in October 2016, there are new interfaces, based on a char device, to manage GPIO in user space. During the Linux Developer Conference Brazil 2019 I lectured on the subject, showing in practice the use of the new interfaces with libgpiod.
This last Sunday, 01/26/2020, the first version of the Linux Kernel of the year was released, v5.5. In this version we have new features in gpiolib, new interfaces for pin configuration. Now we can configure a pin as a pull-up or pull-down via user space 😍.

GPIO Interfaces Kernel v4.8 – gpiolib
Before show what is new, let’s first explore what we already had since the Linux Kernel v4.8. gpiolib is an internal Linux kernel API for managing and configuring GPIO. It provides access to the APIs both in Kernel Space, maintains device drivers generic with relation to the hardware platform, as well as in user space, through ioctl calls on char devices files, in /dev/gpiochipX. Where X is the number of the GPIO bank.
I will use the Raspberry Pi 3B for practical examples, so we can understand how the gpiolib stack is divided, from its application, in the user space, until the functionality is applied to the hardware, GPIO controller, by the kernel space.
To demonstrate the features I will use the tools of the libgpiod project. This library abstracts the ioctl, read and poll calls operations in /dev/gpiochip files, defining a user-friendly API. And in addition to providing command line tools. We have several projects that already implement libgpiod bindings for use with different programming languages.
libgpiod Command Line Tools
gpiodetect
First, let’s use the gpiodetect tool to find out which GPIO banks and how many GPIO lines we have available on our hardware:

In the case of the Raspberry Pi 3B we have two char devices, two GPIO banks. It also lists the name of the driver for each bank. gpiochip0 is controlled by the ARM processor pin control driver, while gpiochip1 is the GPIO expander, which is controlled by the Broadcom VPU. We can also check the banks by listing the gpiochip* in /dev:

gpioinfo
Another interesting feature that we have with the new interface is that GPIOs can be represented by names. For example running the gpioinfo utility:
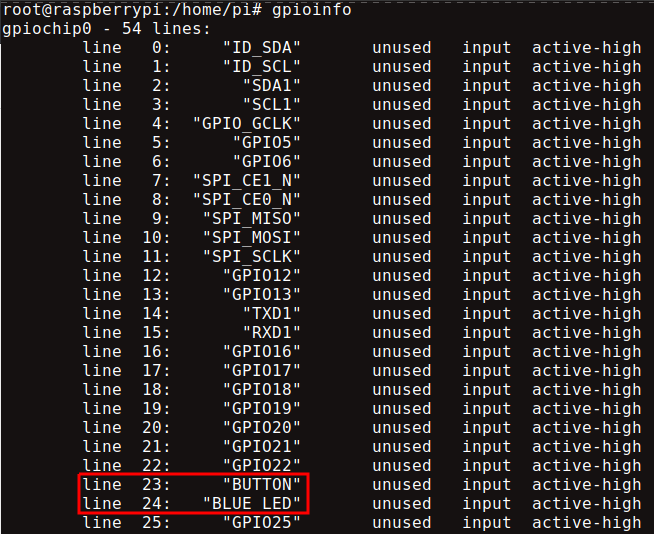
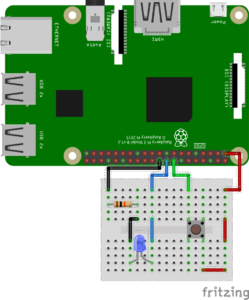
The gpio bank line, its name, a description of the use of the pin and the mux function seted of the pin will be listed. Note the names of lines 23 and 24 of gpiochip0 above. By editing the device tree file bcm2837-rpi-3-b.dts, gpio-lines-names property of the gpio node, we can name the pins according to their function in the project board circuit. For the example circuit, figure below, we have pin 23 connected to a push button and pin 24 to a blue LED:
gpiofind
The line names make it easier to consume pins. It is no longer necessary to decorate, calculate bank and line numbers, or consult datasheets to find the pin. What pin is the blue LED connected to? Easy, let’s ask to the gpiofind tool:

gpioset
With the help of gpiofind, we can write GPIO states, easily by their names with the gpioset tool. For example, let’s turn on the blue LED:
![]()
gpioset expects the bank, gpiochip, GPIO line and the value to be set, 1 for HIGH and 0 for LOW as active-high standard. The above command resolves the GPIO bank and line by its name, using gpiofind. It would be the same as:
![]()
The -m argument of the command is mode, it defines the behavior of the command after setting GPIO. The -m wait tells to the command wait, the process will gets the bank resource and GPIO line for use, until the user types Enter in the terminal. We can use this behavior to explore usage information, on another terminal, with the gpioinfo command:
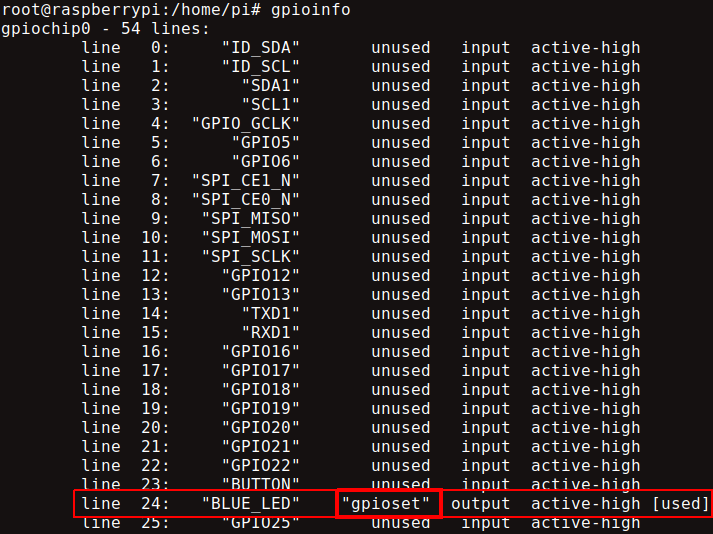
We can see that line 24 is in use. Users of the libgpiod library are advised to describe the use of the pin. Here in the case the developers of the tools, decided to put the name of the utility in the description of use: “gpioset”. This is valuable information for debugging in development, to know what process, who or for what purpose the resource is being used.
Blink Example with libgpiod – C Language
The example below uses the libgpiod API to create a “blink” using our blue LED:
Note line 16 as we get the gpiod_line structure finding for the GPIO line name.
Another interesting line for call to attention is 18. When executing a request to use a pin, one of the arguments is a string describing the use of the pin. With the example running, if we open another terminal and run gpioinfo, we will notice the description:
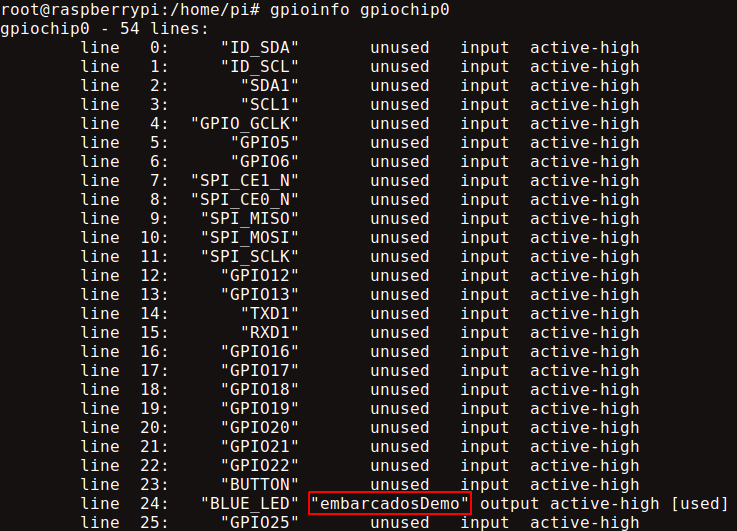
The “embarcadosDemo” means “embeddedDemo” on portuguese 😀.
So the call stack looks like this:
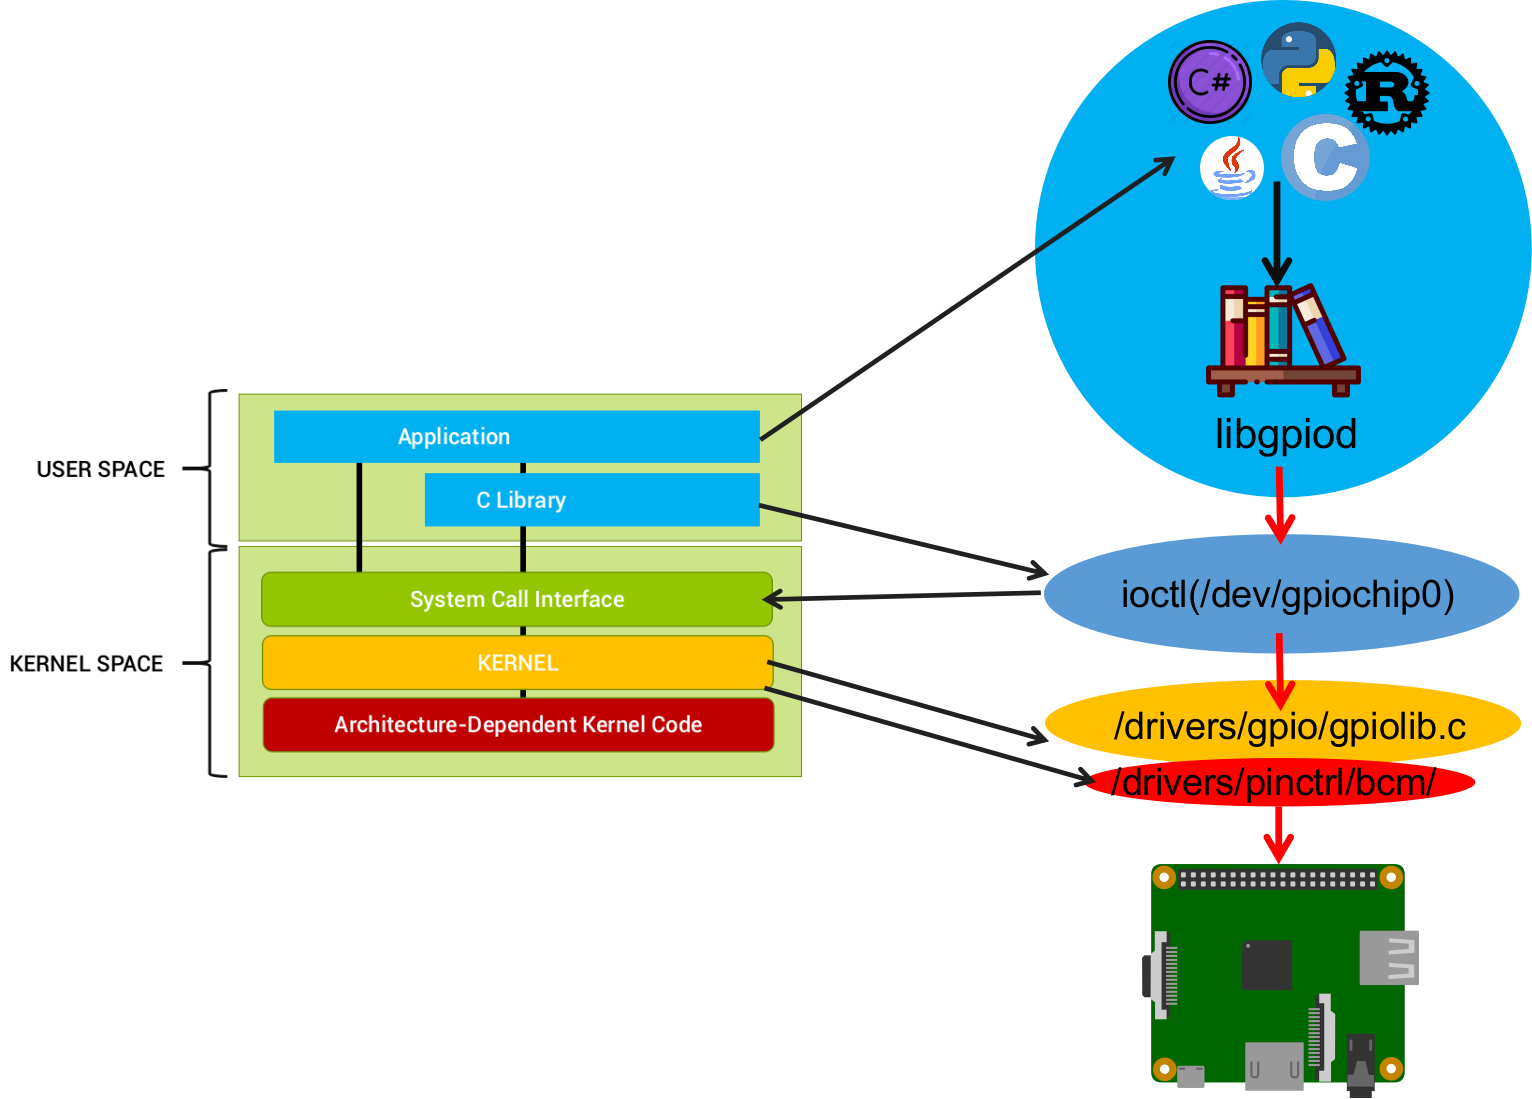
You use the libpgiod library API, or its bindings for the language of your choice, in user space. libgpiod in turn will perform operations on the char device. The system calls pass the control to the Kernel that will execute the generic gpiolib.c code. This in turn will execute the code depending on the architecture of the board, which implements the writing of the registers of the GPIO controller. In the case of Raspberry Pi 3B, ARM Broadcom BCM2837 processor, this implementation is due to pinctrl-bcm2835.c. It executes the writing in the required bank registers and GPIO line and finally we have our LED blinking.
What’s New in gpiolib – Linux Kernel v5.5
In the examples above, note that I did not demonstrate “inputs” with the command line tools, only “outputs”. Because we are going to exemplify the “inputs” together with the news that came in the gpiolib of the Linux kernel v5.5.
We have two utilities for reading GPIOs as inputs: gpioget and gpiomon. gpioget has a pattern similar to gpioset. We can use it with gpiofind to read our button’s input by name:

The gpiomon, GPIO monitor, through poll call is monitoring the state changes on the pin. So, we can use it with gpiofind, to monitor events from our button:
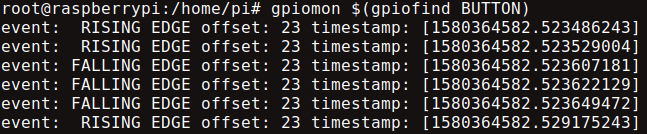
Note that when using the command, with the circuit in our example, the state of the button is “crazy”, it is in a floating state, it is not changing only when pressed:
The circuit of the example button was designed without a pull-down resistor on purpose. Because we are going to use the pull-down function of the processor’s own GPIO controller.
And this is exactly one of the new features of the kernel gpiolib v5.5. Previously to configure a pin as a pull-up or pull-down, you would have to describe the pin configuration via device tree. We now have a new interface that allows this to be done by the gpiolib char device, via user space 😮.
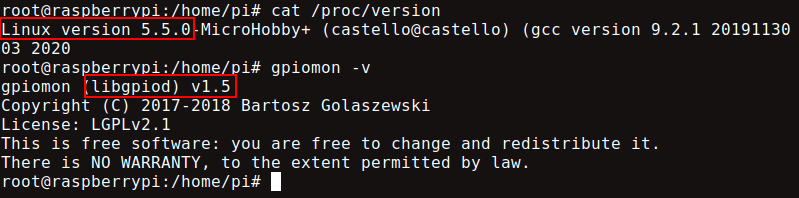
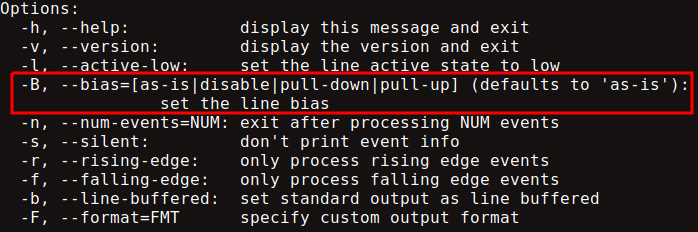
To use this feature you need to be running a Linux kernel v5.5 or higher, and have libgpiod v1.5 or higher:
libgpiod v1.5 already includes the bias -B argument in the command line tools:
So we can use gpiomon by configuring the pin of our button with pull-down:

Solving the pin fluctuation problem, now we will only change the state when we press the button:
Conclusions
Configuration of bias via user space has always been a feature that many asked for, and were in doubt as to whether it was possible to configure pull down or pull up via sysfs for example. The community of developers of the Linux Kernel heard the cry of the makers and finally implemented in gpiolib of v5.5. They are still very fresh news, until arriving at Raspbian, for example, it can take a while. So to use them for now, you will probably have to compile your own Kernel v5.5 and libgpiod v1.5.
libgpiod makes it very easy to use the interfaces, abstracting the calls from ioctl, open and read on /dev/gpiochip files. In addition to having complete command line tools, which can facilitate use in bash scripts for example. It is a library maintained by the community that has contributors who are also part of the Linux Kernel developers, in fact maintainers of the gpio and pin control subsystems.
gpiolib is quite complete. Now we can say goodbye to /sys/class/gpio and wiringPi libraries (writing in /dev/mem that ugly 😢) without fear! The new user space GPIO management interfaces are the most secure, reliable and recommended way to work with GPIOs. They are designed to work in conjunction with the kernel space, to keep track of hardware and resource states in the best way.