I presented in the previous post my adventures with porting .NET nanoFramework to Linux and NuttX. In this article I will show you how it was possible to run .NET nanoFramework applications using this port on a Raspberry Pi Pico 🤯.
To store your .NET application we have two options. Load assemblies from an SDCard, or generate a .uf2 file with the assemblies linked together with the runtime firmware.
⚠️ To generate the runtime firmware you must have Docker running on your development computer.
⚠️ If you choose to use SDCard to load assemblies, connect the SDCard module as follows:
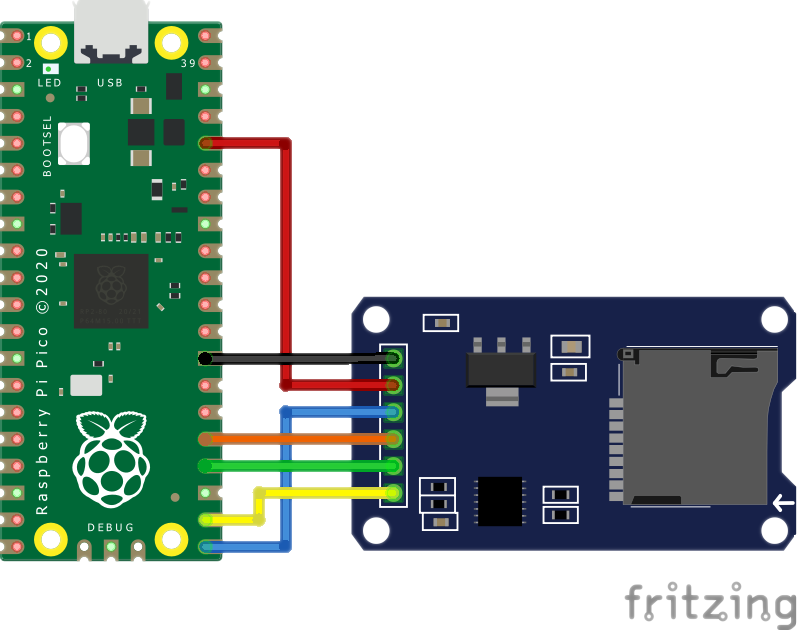
Connection:
      SD card slot   Raspberry Pi Pico
       DAT2          (NC)
       DAT3/CS ----- GP17 (SPI0 CSn)        (Pin 22)
       CMD /DI ----- GP19 (SPI0 TX - MOSI)  (Pin 25)
       VDD     ----- 3V3 OUT                (Pin 36)
       CLK/SCK ----- GP18 (SPI0 SCK)        (Pin 24)
       VSS     ----- GND                    (Pin 3 or 38 or ...)
       DAT0/DO ----- GP16 (SPI0 RX - MISO)  (Pin 21)
       DAT1          (NC)
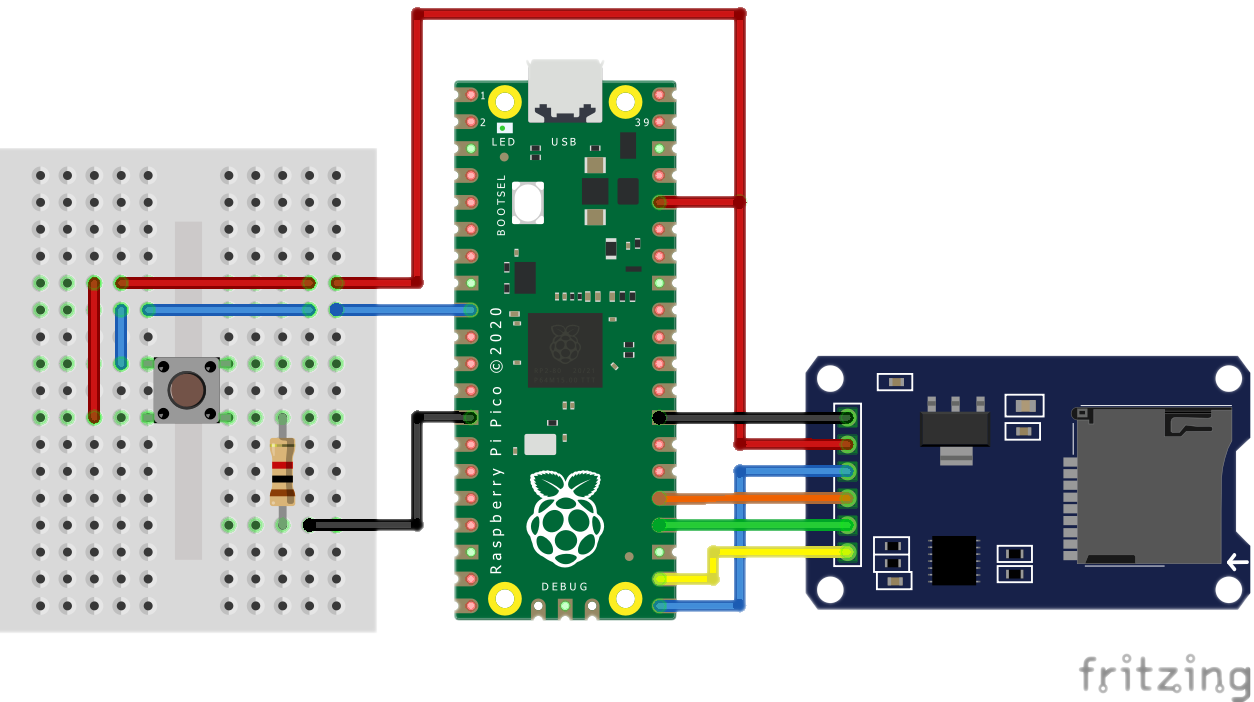
For the C# example, I'm going to demonstrate, I'm also using a push button connected to GP6, pin 9 of Pi Pico:
⚠️ In NuttX the GPIOs are not allocated on demand, but pre-configured during the build (this is something I'm working on to modify). Therefore, for now only the following Pi Pico GPIOs are available for use:
GP25 = GpioPinDriveMode_Output;
GP2  = GpioPinDriveMode_Output;
GP3  = GpioPinDriveMode_Output;
GP4  = GpioPinDriveMode_Output;
GP5  = GpioPinDriveMode_Output;

GP6  = GpioPinDriveMode_Input;
GP7  = GpioPinDriveMode_Input;
GP8  = GpioPinDriveMode_Input;
GP9  = GpioPinDriveMode_Input;
You can use any solution created by the .NET nanoFramework extension for Visual Studio.
If you are a Linux user, unfortunately there is not yet a template for the dotnet CLI (to be independent of VS 2019 for example). For this case I created an example that you can clone the repository and use with VS Code.
Follow the steps with a terminal opened:
1- Clone the repository of examples:
git clone https://github.com/dotnuttx/nanoFrameworkPOSIX-samples.git
2- Go to the PiPico folder:
cd nanoFrameworkPOSIX-samples/PiPico
For demonstration purposes we will compile the following Program.cs:
using System.Diagnostics;
using System.Threading;
using System.Device.Gpio;
using nanoFramework.Runtime.Native;

GpioController gpioController = new GpioController();
// GP25 (onboard LED)
GpioPin onBoardLED = gpioController.OpenPin(25, PinMode.Output);
// GP6 (pin 9)
GpioPin button = gpioController.OpenPin(6, PinMode.Input);

while (true)
{
    // blink
    onBoardLED.Toggle();

    // check if button is pressed
    if (button.Read() == PinValue.High)
    {
        Debug.WriteLine($"Running nanoFramework on {SystemInfo.TargetName}");
        Debug.WriteLine($"Platform: {SystemInfo.Platform}");
        Debug.WriteLine($"Firmware info: {SystemInfo.OEMString}");
    }

    Thread.Sleep(500);
}
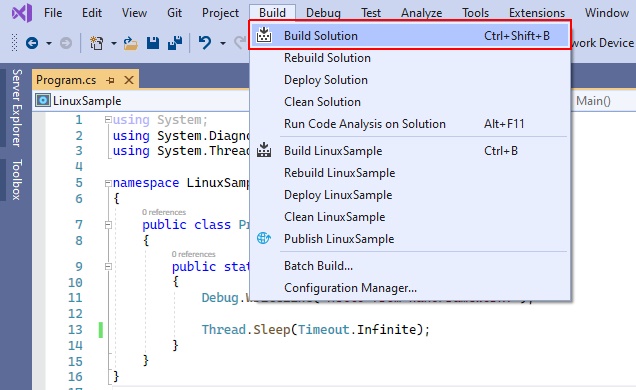
⚠️ If you are on Windows using VS 2019 and the nanoFramework extension, just run theBuild Solutionto generate the assemblies
⚠️ If you are on Linux follow the CLI steps. We will use commands that are part of Mono, so make sure you have the latestmono-completepackage installed on your Linux distro.
3- Download the NuGet packages listed in packages.config, run:
nuget restore
⚠️ Thev2.6.4.6version of the interpreter for Linux needs exactly the1.10.5-preview.18version of thenanoFramework.CoreLibrarypackage
4- Compile the solution, run:
msbuild
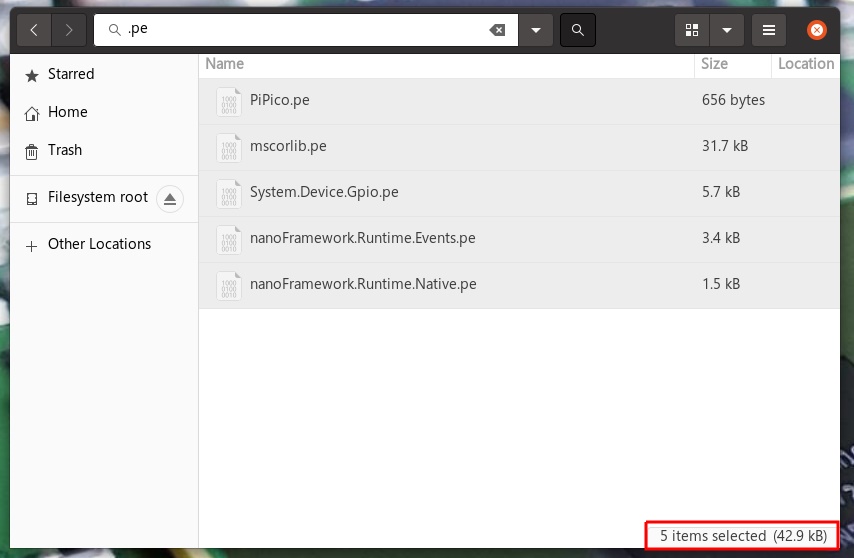
After the build you should have the following files with the .pe extension in the project's bin/Debug/ folder:
ls -l bin/Debug/*.pe

-rw-r--r-- 1 castello castello   960 Jun 23 00:34 bin/Debug/PiPico.pe
-rwxr--r-- 1 castello castello  5684 Jun 19 08:09 bin/Debug/System.Device.Gpio.pe
-rwxr--r-- 1 castello castello 31668 Jun 19 07:25 bin/Debug/mscorlib.pe
-rwxr--r-- 1 castello castello  3412 Jun 19 07:44 bin/Debug/nanoFramework.Runtime.Events.pe
-rwxr--r-- 1 castello castello  1496 Jun 19 07:46 bin/Debug/nanoFramework.Runtime.Native.pe
These are the Portable executables/assemblies that the .NET nanoFramework interpreter knows how to read and execute. If you have them listed in the bin/Debug/ folder, congratulations 🎉 you have successfully compiled the application.
1- Format an SDCard to FAT32 and copy all the .pe files from the bin/Debug/ folder to the root of the SDCard.
⚠️ Don't worry about SDCard storage capacity, I recommend using the smallest available capacity. The generated assemblies are quite small.
2- Remove the SDCard from your development computer and plug into the SDCard module connected to Pi Pico.
3- Install the nanoFramework Runtime (Raspberry Pi Pico RP2040) on the board. You can download pre-compiled Raspberry Pi Pico RP2040 runtime firmware here: https://github.com/dotnuttx/nf-Community-Targets/releases

Download the file dotnet-nf.rp2040-Nuttx.2646.uf2 .
Connect the Raspberry Pi Pico, with the BOOTSEL button pressed, via USB to your development computer:
Copy the dotnet-nf.rp2040-Nuttx.2646.uf2 file to the storage listed. Done, runtime installed 😎.
1- Pull the Docker image:
docker pull dotnuttx/generate-pico-uf2
2- In your solution folder, from our example nanoFrameworkPOSIX-samples/PiPico, run the following command:
docker run --rm -it -v "$(pwd)/bin/Debug:/nf" dotnuttx/generate-pico-uf2
This command will share your solution bin/Debug folder with the container and will generate a .uf2 file, this will contain the .NET nanoFramework runtime with the .pe assemblies already built in, ready to be flashed to the your Raspberry Pi Pico.
After running the command check if a new file called dotnetnf.uf2 has been created in the bin/Debug folder of your solution. If so, congratulations 🎉 you have generated your custom firmware.
3- Install your nanoFramework Runtime (Raspberry Pi Pico RP2040) on the board. Connect the Raspberry Pi Pico, with the BOOTSEL button pressed, via USB to your development computer:
Copy the dotnetnf.uf2 file to the storage listed. Done, your runtime has been installed 😎.
After firmware installation (copy of .uf2 file), the board will reboot itself and the runtime will run the application automatically.
⚠️ The firmware also creates a serial port through the USB connected to your computer, so we can see the return ofDebug.WriteLine. Connect in serial, in the case of Linux it will be listed in/dev/ttyACMxand in Windows the defaultCOMx, with a baud rate of115200.
If after installing the runtime you have the Pi Pico on board LED blinking, and when you press the button the following message is be written on the serial:
Congratulations 🎉! You've run your first .NET application on a Raspberry Pi Pico 🤯.
.NET nanoFramework 🤘! But it is worth remembering that:
⚠️ This one is an unofficial port! It's something I'm working on weekends and during my free time, something 'EXTREMELY EXPERIMENTAL'. I'm not being funded by any group or institution for do this.
There is a lot of work ahead, for now only GPIO, from hardware-specific features, are implemented (support for i2c is coming soon). For more about it check out the blog post: Porting .NET nanoFramework for Linux and NuttX
We already know that the .NET nanoFramework core team is working on a Pi Pico port for Azure RTOS. My experiments are valid (I think 🤔) as proof of concept for the POSIX port of the nanoFramework. Working at this port we can run nanoCLR on an arsenal of 67+ microcontrolled boards of different architectures, which NuttX supports (NuttX is a RTOS with great POSIX compatibility), and plus an endless list of platforms and microprocessed architectures that run Linux.
Did you like the possibility? If this is in any way helpful, or makes sense to you, let me know. Send me a hello on Twitter @math_castello or Linkedin 👍