Keyboards with backlighting are on the rise for both gamers and programmers. Its basic functionality is to illuminate keys in dark environments making it easy to view and type. But how about extending this functionality? In this article I’ll show you how I hacked my Samsung Odyssey’s Backlit Keyboard to “blink” when I receive notifications.
Blink Notification
See the example below:
The idea was to draw attention beyond the pop up that appears on the screen with the keyboard blinking, or in fade if you prefer this way, when we receive some notification. This is also useful for example when we leave our machine in lockscreen, with this hack if a notification is received, even with lockscreen, the keyboard will blink. So I know if I received something, email, skype, Facebook messenger and etc in that time I did not pay attention to the Notebook.
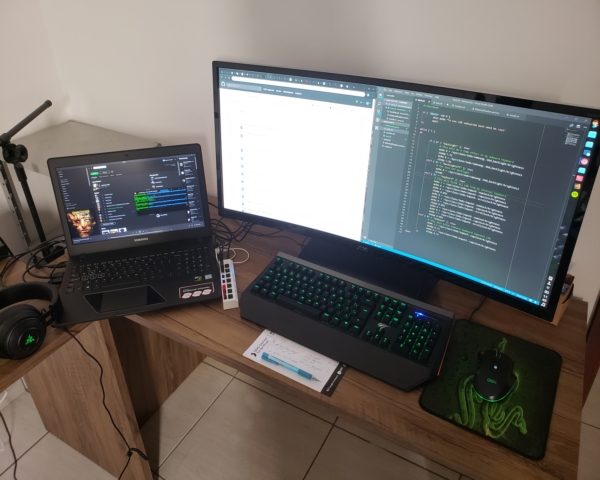
In my case it was a very useful extension of functionality, because I use an external screen, keyboard and mouse. The notebook’s screen use for less routine functions, I leave the Spotify open, some debugger or terminal, and I rarely use the onboard keyboard.
The Hack
To make this hack what I needed was a Notebook with Backlit Keyboard and a Linux distribution. Here I am using my favorite Linux distro: Mint. The Linux Kernel is very complete and detected the Backlit Keyboard of my Odyssey thus giving me access to some controller functionality by the virtual sysfs of the LEDs subsystem.
Kernel LEDs Subsystem
The Linux kernel has a sub system just to take care of the LEDs. For example, those LEDs on our keyboard, num lock, caps lock and scroll lock are controlled by the LED Subsystem. Doubt? Open the terminal and check the LEDs that the kernel detected on your machine with the following command:
cd /sys/class/leds
ls
Here on my machine Kernel listed me these LEDs:
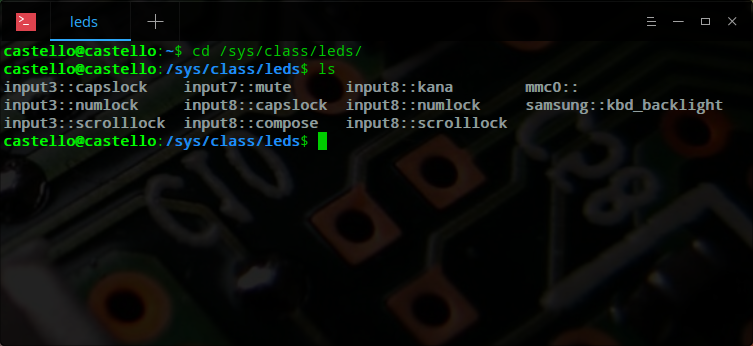
Each LED that the Kernel detects is a folder so we can enter into them and list. I will use as an example the caps lock of my onboard keyboard:
cd input3::capslock
ls
Here what are listed:
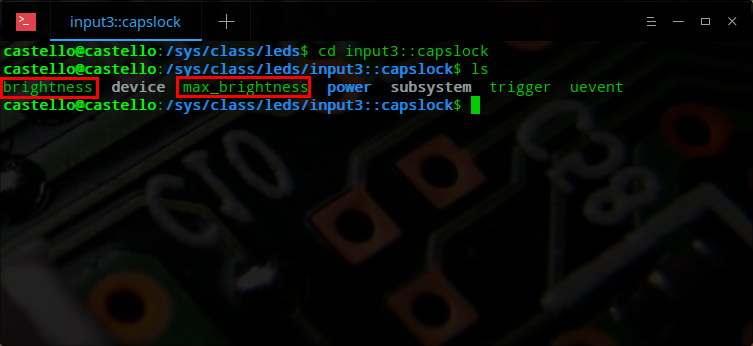
Inside the device folder we will have some files and other folders. What is important now for our hack are the files brightness and max_brightness these “files” are part of the virtual file system of the controller of the LEDs subsystem. What? These files are not really files. What? Yes, as the name already indicated they are virtual. They are mapped in memory and performing “write” and “read” functions in these files actually is as if I were writing to a variable or calling a function of the LED controller. Cool, no? For example when reading the file max_brightness it will check on the LED controller what maximum brightness this LED can have and return it in a number:
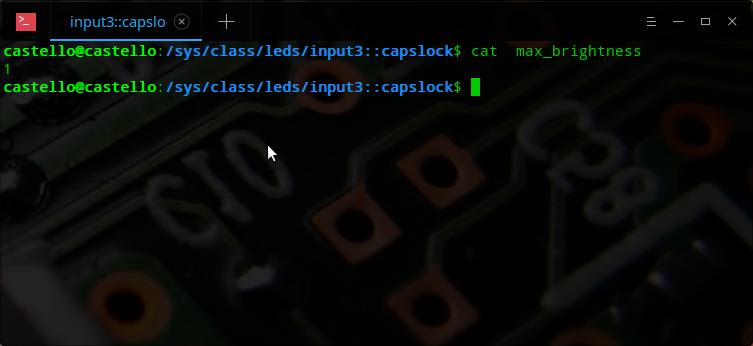
So now I know that my LED can have the maximum brightness of 1. That is, this LED supports the values from 0, LED off, to 1 of maximum LED brightness. But where do I enter these values? This we can write in the file brightness. Usually our default user does not have write access to the virtual file system, so for writing in it I’m going to use sudo su to run as root:
Writing 1 in brightness we turn on the LED of the caps lock, and typing 0 we turn off. Having access to these functionalities give us possibilities to write programs to extend the functionalities of our LEDs.
Scripts
Iside LEDs that my kernel controls are the keyboard backlight of my notebook:
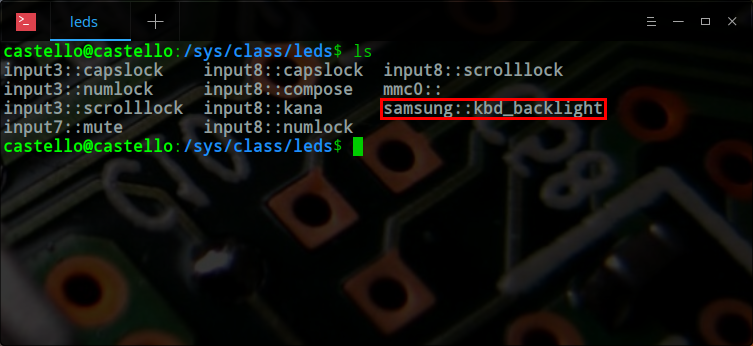
So we can write a script to use the features of this LED:
#!/bin/bash

if [ "$EUID" -ne 0 ]
	then echo "To use LED subsystem bash need to be root"
	exit
fi

if [ $1 = "off" ]; then
	echo 0 > /sys/class/leds/samsung::kbd_backlight/brightness
	exit
fi

while [ 1 ]
do
	# this will do a fade effect in my onboard keyboard backlight
	echo 0 > /sys/class/leds/samsung::kbd_backlight/brightness
	sleep 1.7s
	echo 8 > /sys/class/leds/samsung::kbd_backlight/brightness
	sleep 1.5s
done
This script, which I’ll call blink.sh from now, will generate a fade effect by turning the backlight on and off as if it were pulsing. If we read the max_brightness of this LED we will see that it returns 8, so we can set the brightness from 0 to 8. Another thing I noticed is that even if you can set the brightness in more steps the controller always does the fade effect, dim the brightness . So instead of setting the steps I went from 0, off, to 8 maximum brightness giving a longer time to sleep for the controller itself do the fade effect.
The on and off is within a while running forever, or until we stop the process. There is the possibility that when we stop the process our script is in the part where it is to turn the backlight on, and the light will stay on. For this I put the second “if” that checks an argument “off” that when passed to the script just turns off the backlight and exit the process. This will be useful when we are using blink.sh in our complete hack.
Monitoring Notifications
Ok we already have a script to blink and turn off our keyboard backlight, now let’s put some functionality in it. For our backlight to blink only when we have a new notification, we have to monitor the notifications that arrive on our computer. In graphical interfaces that use the freedesktop.org standard and the dbus to intercommunicate between applications, is the case of Mint Cinnamon, all notifications are messages transmitted by dbus. These messages will be received by the Cinnamon interface which will then make the graphical notification appear on the screen. What we are going to do then is to monitor and filter the messages that will be sent via dbus with dbus-monitor:
#!/bin/bash

if [ "$EUID" -ne 0 ]
	then echo "Please run as root"
	exit
fi

# monitor the notifications
su -c "dbus-monitor \"interface='org.freedesktop.Notifications'\"" castello |
while read LINE; do
	# filter only the member field
	RET=`echo $LINE | grep -o 'member=.*'`

	if [[ $RET == *"Notify"* ]]; then
		echo "new notify"

		# set notification
		if [[ $PID == "" ]]; then
			echo "set backlight"
			./blink.sh &
			PID=$!
		fi
	fi

	if [[ $RET == *"NotificationClosed"* ]]; then
		echo "notify closed"

		# clear notification
		if [[ $PID != "" ]]; then
			echo "turn off backlight"
			kill $PID
			./blink.sh off
			PID=""
		fi
	fi
done
This script has a nice “trick” that we need to pay attention to. As I said above we need to be root for written in the virtual file system of the LEDs subsystem. But if we run the dbus-monitor with root we will not receive the messages of the applications that are running on our default user. So this script asks to be root in the beginning, but, runs the dbus-monitor with its default user:
su -c "dbus-monitor \"interface='org.freedesktop.Notifications'\"" castello
The su command receives the -c argument and the command string, our dbus-monitor with the notifications interface filter, and finally su receives the user with which we want it to run the command. So if you are going to use this script be sure to modify the “castello”, which is the default user on my machine, by your machine default user.
With this trick done dbus-monitor will receive all the messages sent by dbus, and it is a lot of messages. So what we do within the “while” is to get all lines received by the monitor and filter, using grep, looking for messages with the field “member”:
su -c "dbus-monitor \"interface='org.freedesktop.Notifications'\"" castello |
while read LINE; do
	# filter only the member field
	RET=`echo $LINE | grep -o 'member=.*'`
Done this now we have to verify if the messages received contains the “member” Notify field that “member” is sent when we receive a notification:
if [[ $RET == *"Notify"* ]]; then
	echo "new notify"

	# set notification
	if [[ $PID == "" ]]; then
		echo "set backlight"
		./blink.sh
		PID=$!
	fi
fi
If the message contains Notify then I check the PID variable, which saves the process id of the last call to our blink.sh script, if the PID is empty then we can call our blink.sh script to start blinking the keyboard, and save your PID. Why is it important? Because we can receive multiple notifications at once, and there is no need to call multiple processes for our blink.sh script, i]and this may even stick in our script. So we only start a new blink.sh process when it is not actually running.
And when we get a message with the NotificationClosed “member”, it means that some notification has been closed:
if [[ $RET == *"NotificationClosed"* ]]; then
	echo "notify closed"

	# clear notification
	if [[ $PID != "" ]]; then
		echo "turn off backlight"
		kill $PID
		./blink.sh off
		PID=""
	fi
fi
In this case it is the opposite of the previous condition, I check the PID variable if it is not empty. In other words, to clean a process of blink.sh that exists, we have to have a valid PID, which means that blink.sh is running. So I kill PID, blink.sh, clear the PID stored leaving it empty, and call the blink.sh again, but now with the “off” as argument that will just turn off our backlight.
Customizations
On my machine I have extended blink.sh to use effects on all my LEDs, passing an argument to select the LED. Here LEDs from my external keyboard:
Conclusions
Using open standards and an open source Kernel, in case of the Linux Kernel, give us the possibility of Hacks and customizations, the limit is due to their imagination.
Here I used the LED subsystem in conjunction with the notifications, but you can use it for other customizations and automations.
If your Notebook has a Backlit Keyboard, it does not necessarily have to be the Samsung Odyssey, see the list of LEDs detected by the Kernel in /sys/class/leds. If the Kernel detects your backlit keyboard you can apply the same Hack.
